Newer
Older

# Ausstellung-Virtuell - Folge & Varianz
Diese Projektseite enthält den Quelltext der Webseite zu dem Projekt "Ausstellung-Virtuell - Folge & Varianz".
[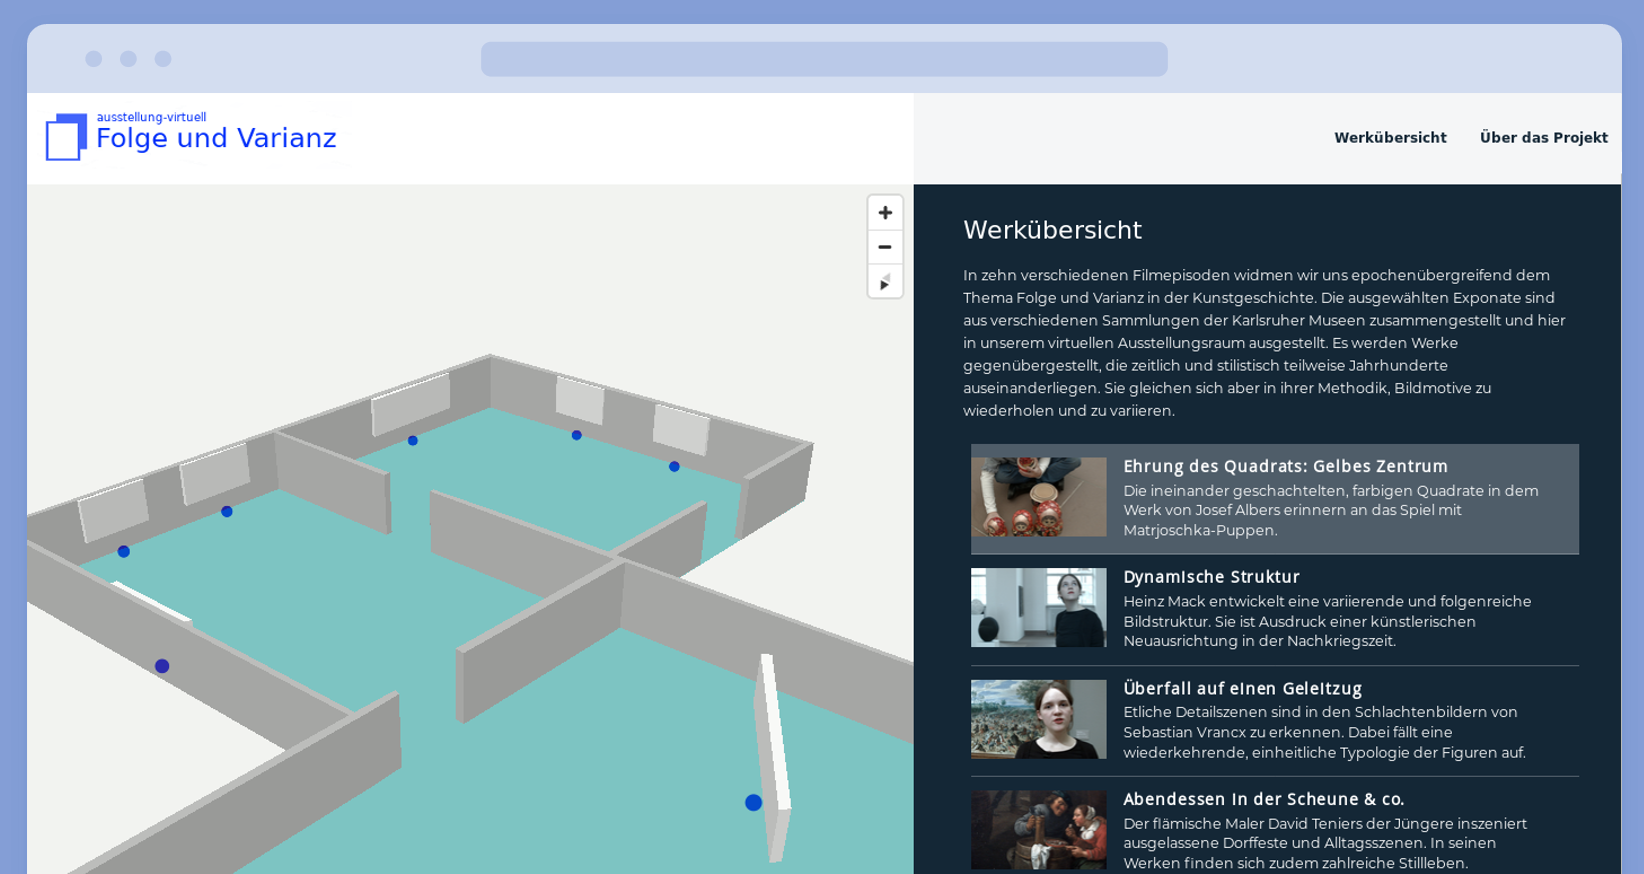](https://git.project-insanity.org/onny/web-ausstellung-virtuell.de/raw/master/presse/img/screenshot_werkuebersicht.png)
## Features

- [x] Explore virtual exhibition in a real 3D map
- [x] Click on a single exhibit for further details
- [x] Browse the episode list
- [x] Play videos in custom HTML video player
- [x] Completely self-hosted map and video data
- [x] Responsive interface, mobile friendly
## Prerequisites

## Installation

### Preparing the map data
21
22
23
24
25
26
27
28
29
30
31
32
33
34
35
36
37
38
39
40
41
42
43
44
45
46
47
48
49
50
51
52
53
54
55
56
57
58
59
60
61
62
63
64
65
66
Since the 3D map of our online exhibition will be self-hosted, we need to fetch
and prepare the backend geo-data for the city of Karlsruhe.
We'll use an [OpenMapTiles](https://openmaptiles.org/) script to generate vector
tiles of public available map data provided by the
[OpenStreetMap](https://www.openstreetmap.org/) project.
```
git clone https://github.com/openmaptiles/openmaptiles.git
cd openmaptiles
./quickstart.sh karlsruhe-regbez
cp ./data/docker-compose-config.yml karlsruhe-config.yml
```
We further customize our custom configuration file `karlsruhe-config.yml`, set
the max zoom level to 14 and tighter BBOX boundaries (taken from
[here](https://openmaptiles.com/downloads/europe/germany/karlsruhe/)) to cover
only the core part of the city. This will result in an acceptable loss of map
details but will save some computation time.
```
version: "2"
services:
  generate-vectortiles:
    environment:
      BBOX: "7.893, 48.73, 8.816, 49.246"
      OSM_MAX_TIMESTAMP : "2018-10-27T19:37:25Z"
      OSM_AREA_NAME: "karlsruhe"
      MIN_ZOOM: "0"
      MAX_ZOOM: "14"
```
Further specify the zoom levels in `.env` file:
```
QUICKSTART_MIN_ZOOM=0
QUICKSTART_MAX_ZOOM=14
```
Now start we can start generating the vector tiles:
```
docker-compose up -d postgres
docker-compose -f docker-compose.yml -f ./karlsruhe-config.yml run --rm generate-vectortiles
docker-compose run --rm openmaptiles-tools generate-metadata ./data/tiles.mbtiles
docker-compose run --rm openmaptiles-tools chmod 666 ./data/tiles.mbtiles
cp ./data/tiles.mbtiles ./data/karlsruhe.mbtiles
```
We can test the export by launching the development tile server:
```
make start-tileserver
```

### Configuring the tile server
After checking out or downloading the project source code, you can move the
gernated mbtiles file into the `tileserver` directory. Further adapt the urls
inside the `tileserver/style-positron.json` file reflecting your own domain
name. The json value of the key "tiles" contains a reference to the mbtiles
file, in this case "karlsruhe":
```
[...]
"sources": {
"openmaptiles": {
"type": "vector",
"tiles": ["https://www.ausstellung-virtuell.de/tileserver/tileserver.php?/index.json?/karlsruhe/{z}/{x}/{y}.pbf"],
"minzoom": 0,
"maxzoom": 14,
"attribution": "<a href=\"http://www.openmaptiles.org/\" target=\"_blank\">© OpenMapTiles</a> <a href=\"http://www.openstreetmap.org/about/\" target=\"_blank\">© OpenStreetMap contributors</a>"
}
},
"sprite": "https://www.ausstellung-virtuell.de/tileserver/sprite",
"glyphs": "https://www.ausstellung-virtuell.de/fonts/{fontstack}/{range}.pbf",
[...]
```
Please note that the min- and maxzoom properties here define the zoom
levels provided by the vector tiles data. It will be still possible to
"overzoom" level 14 in the graphical map interface.
### Configuring php and the web server
92
93
94
95
96
97
98
99
100
101
102
103
104
105
106
107
108
109
110
111
112
113
114
115
116
117
118
119
120
 * **From the appstore:** The most recent and stable version of the app can be found in the [official appstore](https://apps.nextcloud.com/apps/radio).
 * **Using git:** In your `nextcloud/apps/` directory, run `git clone https://git.project-insanity.org/onny/nextcloud-app-radio.git radio`. Then go to the Apps manager tab in your Nextcloud web interface, and enable the Radio app.
 * **Using the zip archive:** Download the latest [tar.bz2 archive](https://git.project-insanity.org/onny/nextcloud-app-radio/repository/archive.tar.bz2?ref=master), extract the directory inside your `nextcloud/apps/` directory, and rename it to `radio`. For stable releases, you can also download one of the [releases](https://git.project-insanity.org/onny/nextcloud-app-radio/) tar.bz2 archives. Then go to the Apps manager tab in your Nextcloud web interface, and enable the Radio app.
 * **Using package manager:** For ArchLinux, there is an [AUR package](https://aur.archlinux.org/packages/nextcloud-app-radio-git/) available.

 ## Maintainers
 * [Jonas Heinrich](https://github.com/onny)

## Testing
Can be easily tested using Docker:
```
docker run -v /tmp/nextcloud-app-radio:/opt/nextcloud/apps/radio -d --name nextcloud -p 80:80 rootlogin/nextcloud
```
First part of -v is the path to the cloned or downloaded nextcloud radio app. Debug running container it with:
```
docker exec -i -t 665b4a1e17b6 /bin/bash
```
Where -t specifies the container id. If you further need to access the sqlite-database, logs or files inside the data folder of Nextcloud, that you also have to share this folder with the host:
```
docker run -v /tmp/dockerdata:/data/data -v /tmp/nextcloud-app-radio:/opt/nextcloud/apps/radio -d --name nextcloud -p 80:80 rootlogin/nextcloud
```

## Reporting bugs
You can report bugs in the public gitlab repository [here](https://git.project-insanity.org/onny/nextcloud-app-radio/issues) and for discussion you can find a section for the app in the offical Nextcloud forums [here](https://help.nextcloud.com/c/apps/radio).

## Credits
* [radio-browser.info](http://www.radio-browser.info/) database api as backend for this app
* Python example code to query stream metadata, took from [here](https://anton.logvinenko.name/en/blog/how-to-get-title-from-audio-stream-with-python.html).